Get payroll from $20 per month for your first 12 months! Sign up today using promo code EOFY24. Terms apply* - Sign up
Chapters
New to Smartly?
Enabling employees for self-service
Setting permissions
Assigning approvers
Timesheets via Smartly app
Approving and declining timesheets
Adding and editing a time entry
Viewing hours in a pay packet

Timesheet guide for employers

Ditch the paper timesheets and confidently track and manage your team's hours.

Timesheet cover image

Download a PDF copy of the Timesheet guide.

This guide covers:

1. New to Smartly?

2. Enabling employees for self-service.

3. Setting permissions.

4. Assigning approvers.

5. Timesheets via Smartly app.

6. Approving and declining timesheets.

7. Adding and editing a time entry.

8. Viewing hours in a pay packet.


New to Smartly?

If your employees use the app, they will need to be enabled for self-service in your Smartly site.

From our self-service screen, payroll administrators can easily enable self-service and manage permissions for the whole team all from one place!

If you prefer to watch and learn, we’ve captured all the information in a helpful video guide.

Self-service screen: when you log in to Smartly, you can find your self-service screen in the 'Company details' menu.

Here you’ll find your employees, their home departments, email address, usernames, and if they are enabled for self-service.


Turning on self-service for employees

1. Click on 'Set passwords' and tick each employee who will be using the Smartly app for the first time.

2. Once selected, click 'Send'. This will automatically send out a password reset email to your employees. 

Note: Payroll administrators will need to let their employees know their usernames. To simplify, we recommend using their email address as their username. 

Sending password reset to employees that have been enabled for self-service

Enabling employees for self-service

To enable an employee for self-service simply tick the check box, and the system will automatically add their email address as their username to log in to the app (if their username has not already been set). If you want to change the username, delete the default username and enter the new one.


Enabling employees for self-service

1. Tick the 'Enable self-service' check box to turn on the mobile app functionality for your staff. 

2. System will automatically add their email address as their username to log in to the app.

Note: To see which employees haven't been enabled for self-service, click on the 'Enable self-service' column sort arrows.

Enable self-service for an employee

Setting permissions

Once enabled you can set permissions for your employees by selecting the 'Set Permissions' tab. all employees enabled for self-service will have the 'Apply for leave' permission ticked on automatically.

You can easily set permissions for your employees by selecting the checkboxes. Choose which employees you'd like to be able to apply for leave, enter timesheets, approve leave, and approve timesheets.

Set permissions for your employees' app

Assigning approvers

Once you’ve set the permissions for your team, including choosing who will be able to approve leave and timesheets, you can click on the 'Assign Approvers' tab.

Here you can use the dropdown lists to select the leave and timesheet approver for each employee. The leave and timesheet approver lists will only contain the employees you have set as leave/timesheet approvers on the set permissions tab.

You can set approvers one-by-one.

Sorting the Leave Approver column to update the leave approver for multiple employees

Updating in bulk

Or select a group of employees, then click on the edit button to edit multiple employees at once. Once completed, click Confirm.

Scenario: On some occasions, a manager who approves leave and timesheets may take an extended break.

If you need to update the approver for a whole team all at once, you can sort the Leave Approver column, and see every employee that person is the approver for.

Simply select these employees and update the approver in bulk by clicking the edit button.

Editing permissions for multiple employees at one time

Timesheets via Smartly app

Hours submitted through the Smartly app

Hours submitted by employees through the Smartly mobile app automatically feed through to your payroll site.

They will show up in the pending tab until they've been approved by either the payroll administrator or their manager.

If you have managers reviewing team timesheets, hours will be automatically loaded into the pay packet when they are approved. You can pull through all approved timesheets by clicking One touch pay from Run a pay in the payroll site. If hours are declined, the timesheet status will show as declined in the app and the timesheet will be deleted from the payroll site.

See our Smartly app guide for details on using timesheets in the app.

1. Timesheets sync up with an employee’s pay period and each timesheet card shows a seven-day working week.

2. At a glance employees can see how many hours they’ve worked and see where in the approval process their timesheets are.

3. If you selected a timesheet approver, their hours will be sent to their manager to review before approving for payroll.
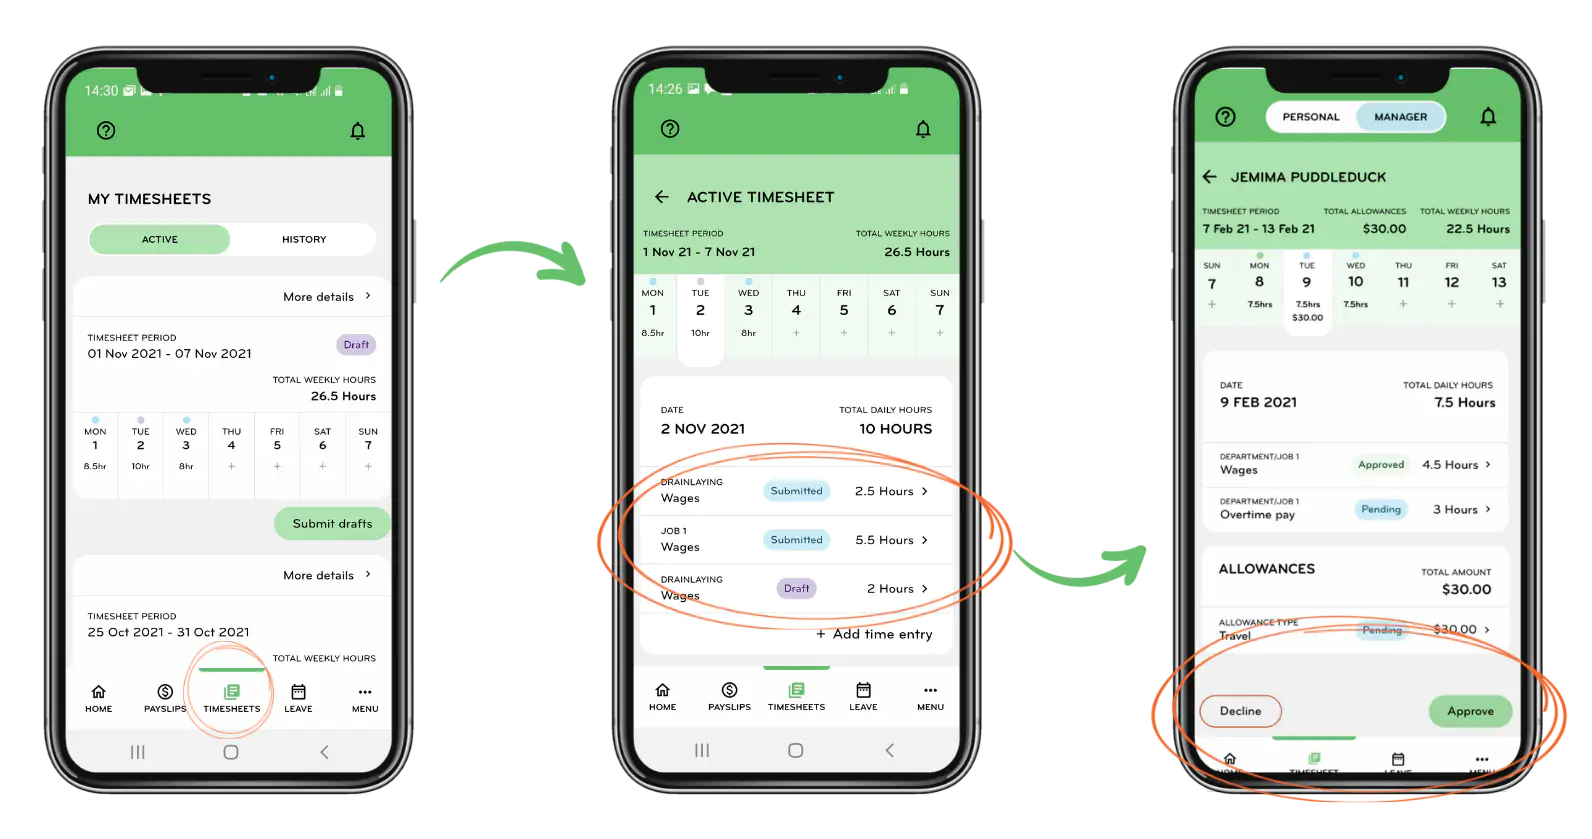
Hours submitted through the Smartly app

4. Or, if you are the approver, you can approve from the Pending tab as explained below.

Hours submitted through the Smartly app 2

Approving and declining timesheets

To view, approve, add or edit employee timesheets head to the Timesheets tab.

On this screen, you have three views:

  • Pending - Hours yet to be approved and added to a pay.
  • Approved - Hours shown in a calendar view,  have already been added to a pay.
  • Completed - Hours that have already been paid.

Follow steps 1-3 to approve or decline a timesheet.

1. Click on the Pending tab

2. Choose your employee and click the pencil icon

3. Approve or decline the timesheet batch

Approving and declining timesheets

A detailed Timesheet report is available in the Smartly site under Report generator which will show a complete breakdown of information entered by your employees including comments. You can access this by:

1. Hovering over Reports and then clicking Report generator.

2. Under 'Select a report', choose Payroll > Timesheets.

3. Under 'Filter and generate', add the filters you need, choose 'Timesheet Detailed Report' under 'Timesheet report type'.

4. Click Download CSV.

Adding and editing a time entry

Managers and payroll administrators can easily add time entries for employees on the Smartly website.

To add an entry, follow steps 1-7.

To edit, just click on the entry in the calendar, make your changes and save.

1. Go to the Approved tab

2. Choose an employee

3. Click on Add entry

4. Choose their Pay Type from the drop-down menu

5. Enter the date and start and end times

6. Enter the unpaid break 

7. Enter the 'Costed to' department or job, if applicable. (This will only be visible if Labour Costing has been activated for the employee). 

8. Click Save and this will approve the hours for the pay and show up in the calendar

Note: Timesheets cannot be withdrawn once submitted by the employee. The timesheet can be edited by the payroll administrator or the line manager, or they can decline the timesheet and ask the employee to resubmit. 

Adding and editing a time entry for an employee

Viewing hours in a pay packet

Approved hours will flow straight through to the pay which you can see by double clicking into an employee's name from Run a pay. You can also pull through all the employees' approved timesheets and leave requests by clicking One touch pay from Run a pay. 

Hours submitted by timesheets cannot be edited in the pay packet. The payroll administrator or manager will need to edit in the timesheet calendar and re-save it.

Was this content helpful? Thanks for your feedback
Yes
No

How can we improve this article?

Please reload the page to view the recaptcha.

Related articles