Group User Management
How to manage users and group access
Multi-Site View (MSV) gives you full control over who can access what across all the companies in your group - all from within Smartly.
With new roles and user management tools, you can create and manage users yourself, assign them to companies, and set their access levels.
What's new in Multi-Site view
Groups: Companies are now linked under a single Group for easier access & control.
New roles: Owner and Admin roles let you manage users and their permissions across the Group.
User management: View, create, edit, deactivate, and delete users within your Group.
Assigned companies: Assign users to specific companies and set their access levels – in bulk or one by one.
Roles:
To give you more control and flexibility, Multi-Site View now includes three distinct user roles. Each role is designed to suit different levels of responsibility, depending on how your team manages payroll across multiple companies.
Here’s the breakdown:
Owner:
- Access assigned companies
- Assign new companies to users
- Create group users
- Edit group users
- Add companies to your group
- Makes key decisions on behalf of your group
Admin
- Access assigned companies
- Assign new companies to users
- Create group users
- Edit group users
- Add companies to your group
Basic
- Access assigned companies
How to view and manage users in your Group
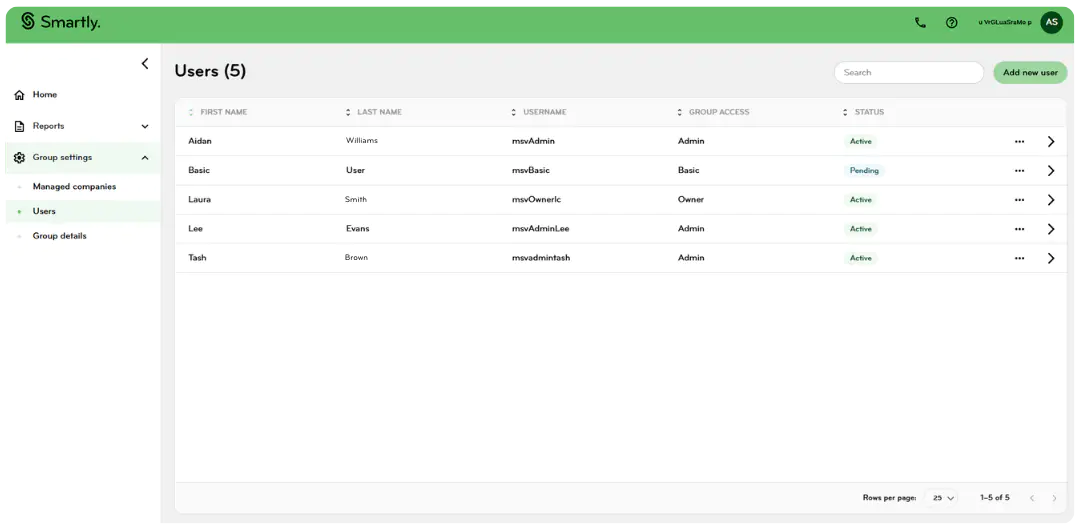
View your Group users
- Click Group Settings, then select Users.
- You'll see a list of users linked to your Group, along with their role and status.

Add a new user
- Click Add new user.
- Enter the user’s details (name, email, phone, etc).
- Choose a role – Owner, Admin, or Basic.
- Click Next to assign companies and set access levels (see below).
- Click Done.
- Option to send an email with a login link. The user will then receive an email invite to set up their login.
- User status will be set as Pending until they have logged in for the first time.

Edit a user
- On the Users page, click the arrow next to a user.
- Update their contact details in the User details tab.
- Click Save.
- Update the user’s or assigned companies in the Assigned companies tab
- Click Save.
- Update the user’s Group access or reset their password in the Group permissions tab.

Deactivate or delete a user
To deactivate a user (e.g. if they’re on leave or no longer need access):
- Click the three dots and choose Deactivate or head to the Group permissions tab inside the user and use the Deactivate toggle.
To delete a user completely:
- Click the three dots and choose Delete.
Tip: Deactivated users can be reactivated later. Deleted users will need to be re-created.

Reset a user’s password
- Find the user on the Users page.
- Click the arrow next to the user and head to the Group permissions tab inside the user.
- Select the Reset password button
- A password reset email will be sent to the user.
.png/_jcr_content/renditions/optimized.webp)
Change the Group Owner
The user assigned the Owner role can transfer ownership to an Admin via the Group Permissions tab. Each Group can have only one Owner at a time. When ownership is transferred, the previous Owner is automatically downgraded to an Admin, and the new Owner is granted the highest level of access to all companies within the Group by default.

Assign companies to users
You can give users access to specific companies in your Group and define what they can do in each one.
Assign companies when creating a new user
- After entering the user’s details, click Next.
- Select one or more companies.
- Set the user’s access level for each:
- View only
- Full access - Click Save.

Update assigned companies for an existing user
- Go to Users and click the arrow next to the user then click the Assigned companies tab.
- From here, you can:
- Add or remove companies
- Change the user’s role per company - Click Save.
.png/_jcr_content/renditions/optimized.webp)
Assign users to companies in bulk
- Click Managed companies.
- Choose the company you want to assign users to, then click the arrow next to that company.
- Click Assign users.
- Select one or more users and set their roles.
- Click Save.
Note: A user's role at a company cannot exceed the maximum access level allowed by that company or the Group.
.png/_jcr_content/renditions/optimized.webp)
View managed companies in your Group
To view the companies linked to your Group:
- Go to Managed companies under Group settings.
- You’ll see all companies in your Group, along with the users who can access them and their roles.
Need to add a new company to your Group?
- Go to Managed companies.
- Click Add new company.
- Our team will be notified and take care of the setup behind the scenes.
Get help
If you're not yet set up on Multi-Site View, or need a hand:
- Contact your Partner Success Manager or call our Partner Success team.
- We’ll help you get your Group, users, and roles sorted.
