Understanding payslips
Payslips can be a bit tricky to get your head around. In this walkthrough, we’ll pinpoint what each title means so it’s easy for you to understand the payslips and to help explain them to your employees.
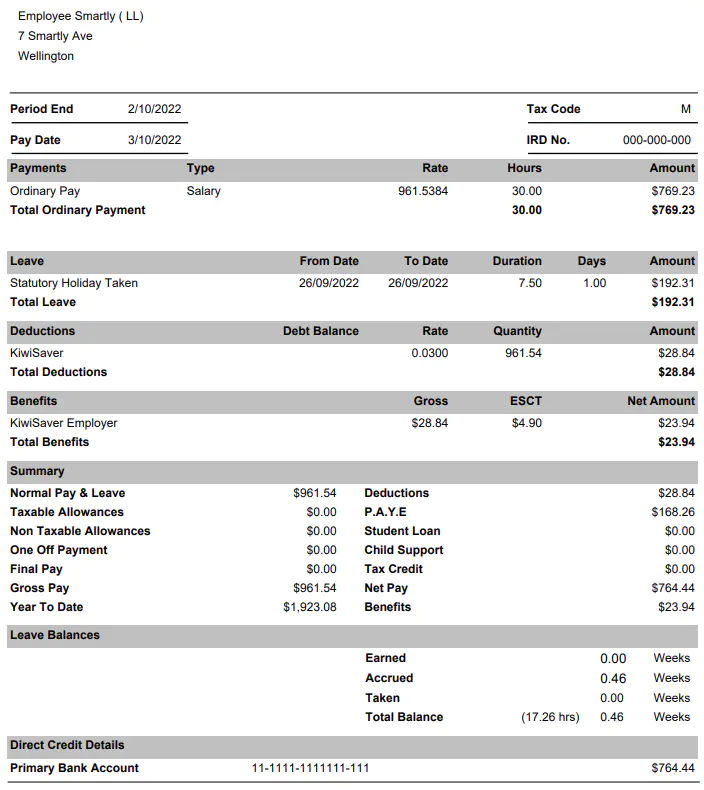
Below is a copy of an emailed payslip. If you or your employees have access to the mobile app, you can view a breakdown on the phone or get it emailed to you by clicking the Email payslip button.

This is an example of a different payslip shown on the Smartly mobile app:

Understanding all the different amounts and terms used in a payslip template can be tricky for both employers and employees. We’ve broken down the different sections and explained what they all mean. The Smartly payslip typically includes the following information and can be set up to produce any extra information you require.
Period end
The time span in which the financial event – in this case, the working period – took place.
Tax code
The tax code helps your employer work out how much tax to deduct from your pay, benefits or pension. To find out more information about your individual tax code click here.
Ordinary pay
The amount of pay the employee received under their employment agreement for an ordinary working week. There are various inclusion and exclusions.
Normal pay
Pay as defined by the employment agreement before deductions.
Taxable allowances
Allowances that are taxable. Inland Revenue has further details about which allowances are taxable, and which aren’t.
Non-taxable allowances
Allowances that are not taxable. Some examples can be clothing and meal allowance. You can find more information on the IRD website on what can be non-taxable.
One off payment
Special payments are usually made to the employees irregularly. An example of a special payment may be overtime.
Final pay
A compensation payment. An employee may have been laid off or has decided to leave the company, and they would then receive their final payment.
Gross pay
The total income, before any deductions like Kiwisaver contributions.
Year to date
The time period starting from the beginning of the current year. This is the financial year.
Deductions
Any deductions that are made from an employee's pay, i.e. KiwiSaver.
PAYE
Stands for “Pay As You Earn“. Deduction of income tax from an employee’s wages before paying them to the employee. The deduction is then sent to Inland Revenue.
Student Loan
Deductions made for student loan payments.
Child support
Deductions made for child support.
Tax credit
A sum that can be offset against a tax liability.
Net Pay
Amount after all deductions. This is the amount the employee receives.
Benefits
Any extra benefits the employee receives.
Holiday Balance
The balance of leave owing.
Primary bank account
The employee's nominated bank account into which payment is made.
Showing leave balances on payslips
What leave balances your employees can see on their payslips depends on your settings under Company details. To edit what leave balances your employees can see, go to:
- Company details > Contract groups.
- Choose a group, eg. Salaried Employees.
- Tick Show on Payslip.
- Save.
Note: It is very important that you do not de-activate any compulsory leave, such as annual leave, by unticking the Active column.

Annual leave balance format on payslips
There are three options you can choose from for showing annual leave balance on payslips:
- Balance Only - this is the total balance, including the Earned leave and the Accrued leave.
- Detailed Balance - Including Accrued - this gives a breakdown of the Earned leave, Accrued leave, Taken leave and the total balance of leave.
- Detailed Balance - Excluding Accrued - this gives a breakdown of the Earned leave, Taken leave and the total balance of leave.
You can also choose to Show Converted Balance. By ticking this option, your employees will see their leave balance in hours as well as weeks.
Changing the contact name on payslips
When employees receive their payslips in their email, the main contact will be listed as the person to contact if they have any queries. If you wish to change this person, you would need to change the main contact. To do so, go to:
- Company details > Users.
- Add > Fill out the relevant sections.
- Tick Main Contact.
- Enter your password under Authorise User Change.
- Save.
- Advise this person of their username and to click Forgot password from the login page to set up their own password.
Note: Only users with administrative access, what Smartly terms as the 'Master User', will be able to see the Users tab under Company details. There can be more than one 'Master User'.
If you need assistance with the above, please do not hesitate to give us a call on 0800 10 10 38.
Emailing payslips
To email your employees their payslips:
1. Go to Pay run options, and click Display payslips.
2. Choose the pay group and pay period end date.
3. Click the Email payslips tab.
4. Make sure the "Email Option" is set to "PDF attachment", and the employees' email addresses have been entered. If not, please input these first and click Update employee details.
5. Tick the employees you want to email payslips to and click Email employee payslips.

If you would like to email several payslips to one employee:
1. Go to Pay run options, and click Display payslips.
2. Choose the pay group and enter the date range in the From and To boxes.
3. Click the Email payslips tab.
4. Make sure the "Email Option" is set to "PDF attachment", and the employees' email addresses have been entered. If not, please input these first and click Update employee details.
5. Tick the employees you want to email the payslips to and click Email employee payslips.
