Pay groups (For kōhanga sites)
Some businesses have employees who are paid in separate pay cycles, or have different leave entitlements. To ensure you're paying the right people at the right time, you can set up multiple pay groups in Smartly.
How to set up a pay group
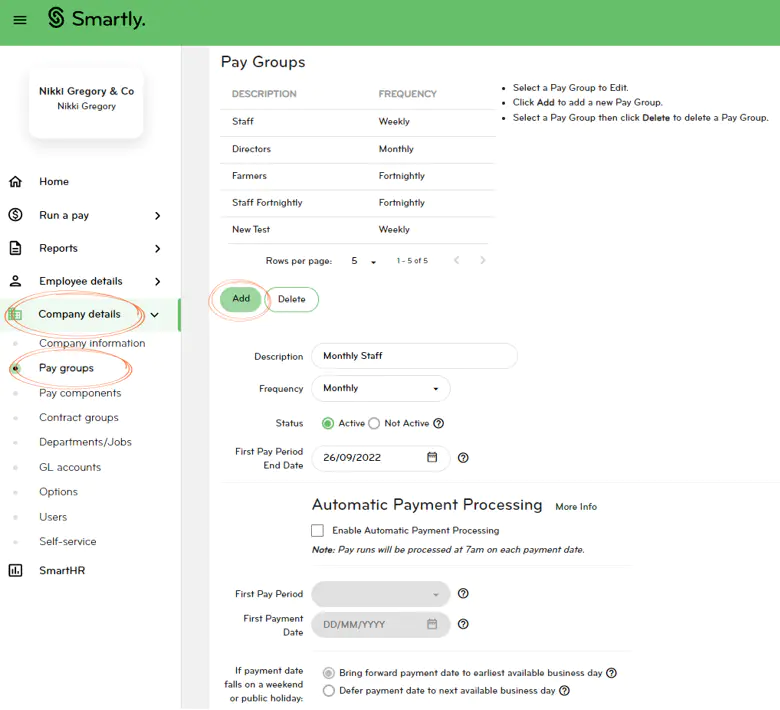
To add a new pay group, follow the steps below.
1. Go to Company details .
2. Select Pay groups.
3. Click Add.
4. Enter the pay group name into the Description box i.e. Monthly Staff.
5. Select the frequency of the pay cycle (e.g. Monthly).
6. Enter the end date of the first pay period in the calendar.
7. If you would like this pay group to be set up with Automatic Payment Processing, tick Enable, then select the First Pay Period it will apply to and enter the First Payment Date.
8. Then select one of the options if a payment date falls on a public holiday.
9. Click Save.
Note: When you set up a new pay group, ensure the payroll admin with administrator rights turns on access to the new pay group for the relevant users.

How to deactivate a pay group
Before you make a pay group inactive, you will need to make sure there are no employees or users assigned to it.
To check there are no employees assigned to the pay group, follow the steps below.
1. Go to Employee details and then Employee list.
2. Click on Pay group so all employees are filtered by Pay group.
3. If you see any employees in the pay group you no longer use, go to their Employee details screen to update.
To check if any users are assigned to the pay group, follow the steps below.
1. Go to Company details.
2. Click on Users.
3. Check the Pay Group Access for each user and untick the unused pay group if applicable.
Note: If you are unable to see the Users tab, then ask the payroll admin that has administration rights to do this for you.
To deactivate a Pay group, follow the steps below.
1. Go to Company details .
2. Select Pay groups.
3. Select the pay group you no longer use and would like to deactivate.
4. Change the Status to Not Active.
5. Click Save.

